Thursday, October 10, 2013

Makena's Baptism Part II


Hola,
I hope you all had a wonderful day. Today I wanted to share with you the things I made for Makena's baptism. I went for a pink + gold vintage-y theme and tried to keep it simple yet elegant. I am very pleased with how everything turned out, but couldn't have done it all without the help of my sister + best friend who both spent hours with me making the crepe paper roses (thank you times a million!)

Let's start with the invitations...

The favors using 8oz mason jars, soy wax, vanilla, and fresh lavender 

The favor tags

Rose crepe paper pom pom centerpieces

Thank you cards using mini crepe paper roses

That's all I have to share today. I hope to be back soon with more fun stuff! :)

Abrazos,
Nat

Monday, October 7, 2013

Makena's Baptism 9.8.13

Hi there, 
I know I said I would share my daughter's baptism photos weeks ago...well you know... life kind of got in the way. Anywho, rather late than never, right? Without further ado I share with you Makena's special day...


My Family
Makena & her daddy
Makena's Godparents
The reception


The favors


Makena's baptism day was beautiful. I think she knew that it was her special day because she was such a good baby all day long. If I had to guess I would say that her favorite part of it all was when the priest poured the holy water over her head. She just looked back as if she were saying, "do it again." It was so precious. We feel as though we have been truly blessed with such a beautiful, happy, healthy, amazing little girl. She is a gift from God, and we are thankful for our gift everyday.

Tomorrow,  I will share with you the crafty things I made for the baptism which include: the invitations, thank you cards, crepe paper pom poms, mason jar candle favors & tags. 

Thanks for stopping by!
Abrazos, 
Nat

Saturday, September 14, 2013

Homemade with Love: Defrosting/Warming & Packing Baby Food

Hello again, yesterday I discussed how to freeze and store baby food. Today I will discuss how to defrost/warm and pack homemade baby food. First things first, how much food do babies eat? Typically most babies eat about an ounce of food per meal when they are first learning to eat solids. With time and as baby grows, they will eat more. What is nice about the ice cube trays is that each cube is approximately one ounce -this gives you perfect little portions of food without hardly any work! As baby grows simply defrost more than one cube at a time.

Defrosting & Warming
There are several ways you can go about thawing baby food. The first way is by creating a double broiler on the stove top by putting water in a pot, and placing a bowl in the pot. Then you just put the frozen food cube in the bowl and let it warm up. Easy! Another way of thawing baby food is by using the good ol' microwave. If you choose to use the microwave be sure to defrost the food cubes in a glass bowl and not a plastic container as research says glass is safer than plastic. Also, when using the microwave BE SURE to stir the food to ensure that there are no hot-spots that will burn baby. Lastly, you may thaw baby food in the refrigerator over night in closed containers. This method obviously takes longer than the first two, but if you plan accordingly its no biggie.

Good to know
Babies like room temperature foods, so reheating and serving baby food cubes warm is not necessary. The food cubes can be served at room temperature once they have been thawed and heated.
Homemade baby food that has been thawed can be kept safely in the refrigerator for up to 72 hours, just be sure to keep the food in a sealed container to avoid any contamination.

Packing
A good overall tip to help ease packing and traveling with baby food, is to try and serve some food at room temperature. By doing this it will allow baby to grow accustomed to food that is not hot. This will be a life saver and you will never have to worry about a meal being rejected because it is not hot. Depending how long I'm out for I pack a mini cooler with my baby food in a container/s. If its a hot day I add an ice pack to the cooler, but it is not always necessary.

Nat's Picks: feeding products

1. Skip Hop Triple Bottle Bag
Originally I bought this bag to store bottles when I'm on the go, but now I use it to pack baby food. It's durable and spacious. It can hold up to 4 bowls of food or 3 bowls and an average size sippy cup. I love that it can attach to my Skip Hop Diaper bag or I can use it as a shoulder or crossbody bag. It also has a compartment in the front for a bib and/or spoons.
Love these guys! You can defrost up to 4 food cubes per bowl. The lids fit nice and secure. I've never had a spill or leak, and they are dishwasher safe.
My good friend recently gave me these as a gift! The tiny holes help keep the food on the spoon longer and the angle of the spoon makes it SO much easier to get the food to the mouth. Great gift!
 I have 3 of these bibs and use them all the time. They are super lightweight, easy to clean, and water resistant. My favorite part about them is the built-in tuck away pouch -perfect for storage!
Choosing the right high chair was a bit of a challenge.  There are literally so many high chairs out there! After going back and forth between a few high chairs we finally decided to purchase this guy. So far, we have zero complaints. It so so easy to keep clean and have several neat features. I think Makena's favorite feature are the wheels. She loves been rolled around in it from the dining room to kitchen and vice versa.
Well that's all I have to share for today. Again, I hope you find this information to be helpful and useful. Next week I plan to start sharing some homemade baby food recipes -so don't forget to check back in!

Abrazos,
Nat

Thursday, September 12, 2013

Homemade with Love: Freezing & Storing Baby Food

Hello,
A few weeks ago I shared a chart with you of what my daughter Makena was currently eating. Well, my baby girl is 4 days away from turning 8 months and is eating a whole lot of food! When I first introduced solids at 6 months she barely at anything. I literally was lucky if she ate a couple of spoonfuls. Also, I took the advice from my lactation consultant and fed her after I nursed her and I got worried that by doing so she was never going to like eating solid foods. I was wrong. It took her about a good solid month for her to get used to eating solid food on a regular basis and now she has grown to love food (and still loves nursing too! win! win!) Now my girl faithfully eats at least three solid meals a day!

Here's a list of all the foods she is currently eating:
1) avocado
2) acorn squash
3) bananas
4) oatmeal cereal
5) pears
6) apples (fuji, gala, and granny smith)
7) butternut squash
8) plums
9) sweet potatoes
10) sweet peas
11) nectarines
12) spinach
13) peaches
14) zucchini
15) green beans
16) beets
17) carrots
18) yukon potato
19) chard
20) eggplant
21) mango
22) broccoli
23) pumpkin
She is quite the eater and I am very pleased that out of all the fruits & veggies her only dislike thus far has been sweet peas. I've tried mixing them with other fruits and veggies and she'll eat them, but they're definitely not her favorite. Once Makena turns 8 months I will start feeding her berries and proteins and I'll also introduce herbs & spices.

I love making Makena's baby food. I admit I may be a little obsessed with baking/steaming, pureeing, and freezing. I just love the entire process from going to the grocery store and picking out new foods, bringing them home to cook, serve, and freeze, but also I know exactly what I'm putting into my daughters body. Oh, and not to mention its so much cheaper!

I like to make a bunch of different food all at one time and freeze it that way I don't have to continually pull out the food processor and make food at every meal -that would be crazy!

With that being said let's get to the freezing & storing of baby food...

Freezing
According to wholesomebabyfood.com baby food cubes are safe to keep frozen for about 3 to 6 months. However, it is recommended to use the frozen baby food within 1 month, due to the amount of water crystals that tend to build up causing the baby food to loose nutrients. If you choose to refrigerate fresh pureed baby food it is recommended to not store it for longer than 48 hours to minimize the bacterial growth.


Storing 
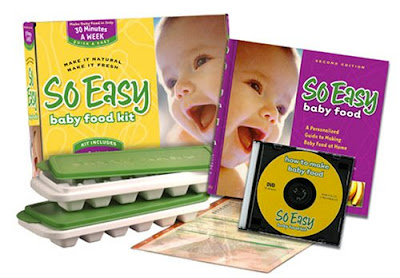
I ordered the Fresh Baby So Easy Baby Food Kit from Amazon around the time I began solid foods. The kit included a cookbook, a how-to DVD, a nutrition tips card, and two freezer trays with lids. Since I like to make a lot of food at once just having two freezer trays was not enough. I thought about ordering more online but Amazon sells them for $8.77 for a pack of two, which I thought was expensive. Around the same time I was searching for more reasonably priced freezer trays w/ lids, I came across the Daiso Japan store (I LOVE this store!) near where I live and found trays for $1.50! What a deal, right? So far they are working out great and the lids are secure like the more expensive ones. Remember that you don't have to have lids for your trays, plastic wrap will do the job just be careful that the purees don't spill out. 
Here's a picture of the dollar fifty trays from Daiso....
Remember that you don't have to store your baby food in ice cube trays you can use mini-muffin trays, individual plastic freezing containers or glass jars that are safe to freeze. I would not recommend Gerber baby food jars or jars that are similar as they are not safe to be frozen and have the ability to crack and leave behind tiny shards and fragments. I know the brand Ball manufactures 4oz jars that are made for freezing. 

I typically allow the baby food to freeze overnight and then I transfer the cubes into freezer ziplock bags and label them with the name & month. By transferring the cubes to freezer bags it frees up the trays for the next batch of food and frees up space in the freezer too!

The process...

I hope that you find this information helpful. Don't forget to check back tomorrow as I will discuss how to defrost/warm and pack baby food and also share some of my favorite feeding products!

Abrazos,
Nat

Tuesday, September 10, 2013

I'm still here!!

Hi there, I'm still here! I haven't given up blogging - I've just been incredibly busy lately with our first family camping trip over the Labor Day, my daughters baptism, and the unexpected loss of our dog Fancy. I'm still working on my goal of one post/week and hope to increase that to 2-3 posts/week, but we'll see. With that being said, today I'd like to share some photos of projects I've made in the past mostly for special events (baby showers, birthdays, weddings) and gift giving. Check back next week when I share the projects I made for my daughters pink & gold baptism.
1st row beginning top left:1) favors for milk & cookies themed boy baby shower. Clear box from Michaels, filled with blue jelly bellies, brown and blue polka dot ribbon from Joanns, light blue imprinted ribbon from Dana's Party Planet, and mini chocolate cookie made using my Cricut and the Lite Sweet Shop Cartridge. 2) baby clothes line banner with baby's name cut out using my Cricut and the Plantain Schoolbook cartridge. 3) washcloth centerpieces made with white Ikea plant pot, artificial flowers, washcloths, wire stem, and green floral tape. 4) paper rosette wreath using designer scrapbook paper and clear gems.
2nd row from top: 1) cookies & milk banner using my Cricut 2) flower & butterfly centerpieces using pink plant pot from ikea, ribbon from Joanns, tissue paper, wooden butterflies & flowers from Joanns and painted using acrylic paints, green wire stem, chocolate candy lollipop molds. 3) paper rosette wreath using K&Company designer paper. 3rd row from top: 1) mini album created with K&Company Watercolor Bouquet collection. 2) wedding favors using ivory boxes by David Tutera from Joanns, all ribbon from Dana's Party Planet, and middle bling from Joanns. 3) styrofoam anchor wreath using navy and white ribbon and tool from Michaels & Joanns. 4) lifesaver jar baby shower favors, jars purchased at Michaels, white life savers, rope from Orchard Supply, sticker tags created my PinkSkyPrintables, label tags cut using tag die from sizzix, cleat thank you stamp embossed with white powder.
4th row from top: 1) purple & pink birthday banner using my Cricut and the Mini Monogram cartridge. 2) Brown, cream & orange sweet baby banner using my Cricut and the Plantain Schoolbook cartridge, held together using gold eyelets and stain orange ribbon from Michaels. 3) Guest pins for baby shower created using my Cricut and ribbon from Joanns.

Let me know if you have any questions about the above projects. I hope you enjoyed them!
Abrazos,
Nat

Wednesday, August 21, 2013

Homemade with Love: a new little baby food series


Hello there,
On my last post I shared Makena’s first solid food -avocado! Today I would like to share some of the other fruits & veggies we have introduced and in the order we decided to do them in.  It’s been over a month now since we started giving M solids and she is now 7 months and up to 10 different fruits & veggies in addition to oatmeal cereal! As suggested by many books, websites, and our pediatrician we waited some time in between introducing new foods just in case M experienced an allergic reaction. The average wait time between new foods is 3-5 days, so we kept it easy and went with 4 days in the beginning. Now that M is a bit older and has been exposed to several foods we now only wait 2-3 days to introduce something new.

Here’s a chart I created of M’s food over the past month.  I have been having lots of fun mixing & matching foods and creating my own recipes.  Since I’m enjoying making M’s food so much I have decided to create a little series called, “Homemade with Love” where I will share with you simple tasty baby food recipes and also give you tips on how to store baby food and all of the wonderful benefits of making your baby’s food. 


Weeks
Monday
Tuesday
Wednesday
Thursday
Friday
Saturday
Sunday
1
Avocado


Acorn squash


2

Banana


Rice cereal


3

Pears

Pears w/oatmeal cereal

Apples

4

Butternut squash


Plums


5
Sweet potatoes


Peas


Nectarines

I hope you find this helpful and please feel to share your tips & recipes!
Abrazos,
Nat